
You can have a lot of fun with Whittling! In just a few short hours you can learn how to make a Gnome Cat or Leprechaun. These ideas will help you get started. It doesn't matter if you are an expert or a beginner, you can create unique pieces of art. It doesn't matter what level of skill you have, the process will be enjoyable. You can even learn how to do it by watching a video tutorial.
Project Leprechaun Whittling
Although leprechauns may resemble cartoon characters, they can be much more. These little creatures can also serve as useful toys. A wood duck can be whittled easily from basswood, and can be painted any color you want. Get started with your Leprechaun Whittling Project by selecting a small wooden block. It's easy to carve a leprechaun, even for complete beginners.
Following the leprechaun carving instructions, you can make your wooden leprechaun or purchase one. Although the leprechaun carving process is easy, it's not complicated. Beginners can skip carving the fingers. This is not necessary but can be difficult. The base can be a bit tricky, but if you don't feel confident carving the base, you can substitute the wide shoes with wider legs.
Rabbit whittling project
You will need to prepare your materials before you can start your rabbit whittling projects. A quality wood carving knife with non-toxic olive oil is required. Five minutes should suffice for the basic cuts. The finishing process will take longer. Here are some tips and tricks to make the perfect rabbit carving. Consider the size of your rabbit before you begin. The border should be thicker than your rabbit's body. It serves two purposes. It keeps the wood from splitting and helps the image appear more dimensional.
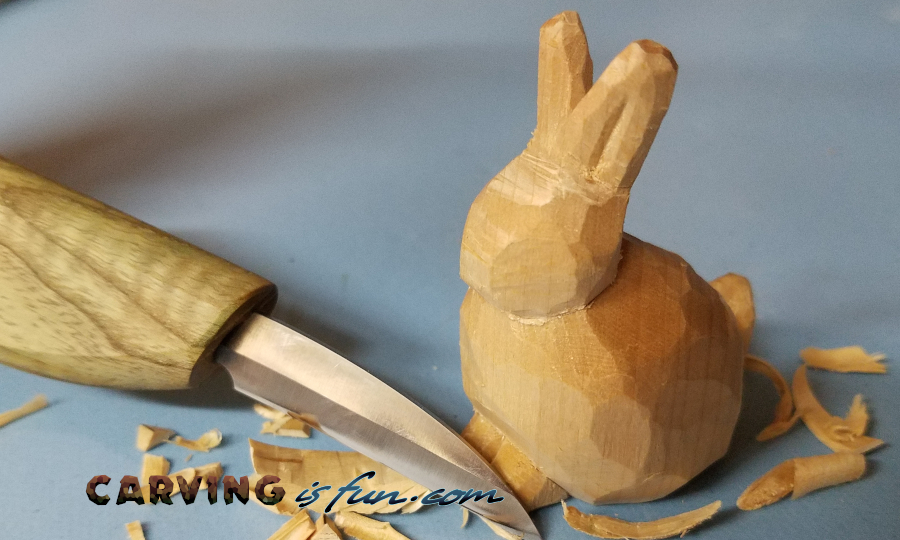
For a beginner, the easiest rabbit whittling project is a small ball in a cage. This is a great starter project, and you can use the finished product to gift on Valentine's Day or as a drinking cup. This project will take a bit of patience, but it will be well worth the effort. The time spent whittling will prepare you for more challenging projects, such carving animals and figurines.
Cat whittling project
If you're a beginner in woodcarving, the best whittling project to start with is a cat. This simple sculpture can be very useful and requires very little effort. Although you don’t need an expert knife or other advanced materials, this small sculpture can teach you important skills. Sharpen it on a leather strop before starting your project. This process should be repeated 10-20 times for each side.
Gnome whittling Project
You might think that this is not a difficult woodworking project, but it turns out it can be very challenging. To cut the gnome's face & hat, you will need a scroll saw. The key to a successful gnome is not having the hat overhang his face. If you want to make a gnome that is impressive, add details to its face.
Both the coat and hat are made from wood. To shape them, you need to cut V-cuts below the top guideline as well as one under the bottom. Once the hat and coat are cut, you can shape the gnome's back and shoulder blades. Stop cutting allows you to cut the pieces apart, making it possible to shape the rest.
Astronaut caricature caricature caricature caricature caricature
Carving an astronaut takes patience, focus, and careful handling. You will need to have the right tools for carving, such as spoon-carving knives, in order to create a good caricature. You can also purchase templates for whittling if you're just starting out. Wood carving can be done step by step with tutorials.
Fairy caricature

A woman princess fairy caricature is a great way to surprise someone. This stunning gift idea is made from a photo of the recipient and includes a cartoon illustration. You have the option to request extra features and preferences for your caricature. Artists take customer feedback into account when creating the caricature.
A great caricature won't be a stereotype but will convey a message. While this type of art can be awkward and insulting, it can also be very convincing. It may also include a message. It's a powerful medium for storytelling.
FAQ
Which wooden products are most popular?
Wood that has been harvested sustainably is the best-selling type of wood.
Most furniture is made from oak, maple, mahogany or walnut.
These woods have beautiful grain patterns and colors. They are also very strong. They are also very durable if properly maintained.
To prevent moisture damage, wood furniture should always first be painted. All surfaces should be painted, including doors, drawers, and handles.
If you want to make sure that your furniture lasts as long as possible, then you should choose a paint that is resistant to water.
It is recommended to use an oil-based primer, then apply two coats. Depending on how often it will be worn, you may need to apply several coats.
Avoid spray cans and aerosol paints. These products are contaminated with solvents, which evaporate rapidly and can leave behind toxic fumes.
How much should a Woodworker Charge per Hour?
The hourly rate paid to a professional woodworker is dependent on many factors. These include skill level, availability, and location.
The average hourly rate for a skilled woodworker ranges from $20-$50 an hour.
An hourly rate of $10 for a less skilled woodworker could be possible.
Where can I begin with woodworking
The best way to learn how to build furniture is by building furniture. While you will need tools, mistakes are inevitable, but you will learn the ropes if you persevere.
Start by choosing a project you'd like to complete. It could be something as simple as a box or as elaborate as a full-scale entertainment center. After you have decided on a project to work on, contact a local woodworker that specializes in this type of work. Ask him or her for advice on what tools you'll need and where to find them. Perhaps you could ask if there is someone else who does this type of work.
Can you teach yourself woodworking?
Doing is the best way to learn any subject. Woodworking takes practice, skill, patience and experience. Any craft requires patience to master.
It is the best way to learn to do something is to actually do it. Start small and then build upon what you've learned.
Statistics
- In 2014, there were just over 237,000 jobs for all woodworkers, with other wood product manufacturing employing 23 percent; wood kitchen cabinets and countertop manufacturing employing 21 percent. (theartcareerproject.com)
- If your lumber isn't as dry as you would like when you purchase it (over 22% in Glen Huey's opinion…probably over 10-15% in my opinion), then it's a good idea to let it acclimate to your workshop for a couple of weeks. (woodandshop.com)
- The best-paid 10 percent make $76,000, while the lowest-paid 10 percent make $34,000. (zippia.com)
- Overall employment of woodworkers is projected to grow 8 percent from 2020 to 2030, about as fast as the average for all occupations. (bls.gov)
External Links
How To
How to stain wood
Staining wood can be described as a process where chemicals are applied to the wood surface. This causes the wood to take on a new color. This chemical reaction causes the wood to change from white to brownish red. Oak is the most commonly used wood for staining, but other woods can also be stained.
There are several ways to apply stains to wood surfaces. You can mix the stain with a solvent, such as turpentine, and spray it onto the wood. Others use a solution made up of water and dye, which is then applied directly onto the wood. The stain can be mixed with paints and varnishes to become part of the final coating.
Preparing the wood surface is the first step to staining it. To apply the stain, clean the wood completely. Sanding smoothens scratches and rough spots. You must then decide on the type of stain that you wish to use. There are two main types of stain: non-penetrating and penetrating. Penetrating stains penetrate deeper into the wood than non-penetrating ones, making them ideal for dark colors such as mahogany. Non-penetrating stains work best with light colors like maple.
After choosing the type and application method you prefer, gather your tools. A paintbrush works well for applying stains because it allows you to spread the liquid evenly across the surface. To remove any stains left behind after painting, you will need some rags. If you plan to mix the stain yourself, make sure you have enough containers available to hold the different components of the mixture.
After you have prepared your materials, clean the area you intend to stain. Clean the area with soap and warm water to get rid of dirt and grime. Use a dampened sponge and warm water to clean the entire piece. Take care to remove all debris and dirt, especially if you are planning on staining darker wood.
Next, spray the stain. Next, apply the stain to the furniture by starting at one end. Slowly and carefully work your way along the grain to reach the opposite end. Make sure that the stain does not drip off the edge of the wood. Before proceeding to the next step, let the stain dry thoroughly.
Clear polyurethane is used to protect the painted surfaces. Apply three coats of polyurethane sealer. Let the third coat dry overnight before you sand the final coat.